Frequently Asked Questions
What types of painting frames do you offer?
Painting Frames Plus (PFP) supplies Ready-Made and Reproduction Frames for people seeking high-quality, affordable alternatives to expensive custom-made and vintage gold leaf frames. Our frames come in Standard and Custom Sizes and a Wide Range of Finishes.
We specialize in Historically Accurate reproductions of frame designs that were popular during the last 600 years — ordering pages Categorized by Historical Periods such as Renaissance, Baroque, Rococo, Neoclassical, and more. Please see the "Frames" menu for a complete listing of frame categories.
What frame sizes do you offer?
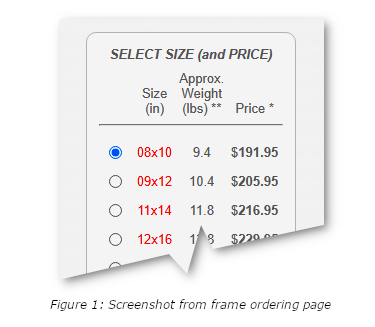
Typical industry Standard Frame Sizes are: 5x7, 6x8, 8x10, 9x12, 11x14, 12x16, 18x24, 20x24, 22x28, 24x30, 24x36, 24x48, 30x40, 36x40, 40x60 and 48x72. Each frame ordering page will list the standard sizes available for that frame. When viewing the frame ordering pages, look for the "Select Size (and Price)" box in the Configure Your Frame section. (see Figure 1)
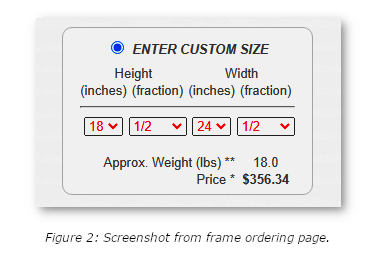
Custom Frame Sizes are only available on certain frame styles and correspond with non-standard artwork dimensions. When viewing the frame ordering pages, look for the "Enter Custom Size" box (located below the standard frame "Select Size (and Price)" box) in the Configure Your Frame section. (see Figure 2)
Additional charges will apply when ordering custom-cut frames.
Custom-cut frames are non-returnable/non-refundable.
How do I calculate the frame size for my artwork?
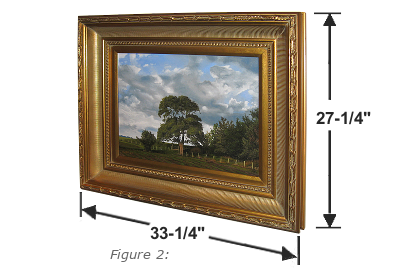
The Frame Order Size corresponds to the size of the artwork and the rabbet recess on the frame's rear. For example, if you have a painting that measures 18" x 24", you would order an 18" x 24" frame. The actual opening of the frame, when viewed from the front, will be slightly smaller. (see Figure 1)
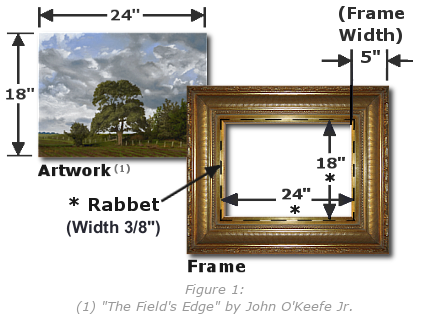
To calculate the approximate outer dimensions of a frame, take the artwork's width (or height) and add the width of the frame molding less rabbet width to each side of your artwork. For example, An 18" x 24" artwork that has a 5" frame molding width and 3/8" rabbet width would measure an outer frame dimension of approximately 27-1/4" x 33-1/4". (The math: 18" + (5" - 3/8") + (5" - 3/8") = 27-1/4" for the overall frame height and 24" + (5" - 3/8") + (5" - 3/8") = 33-1/4" for the overall frame width.) (see Figure 2)
What framing hardware do you offer?

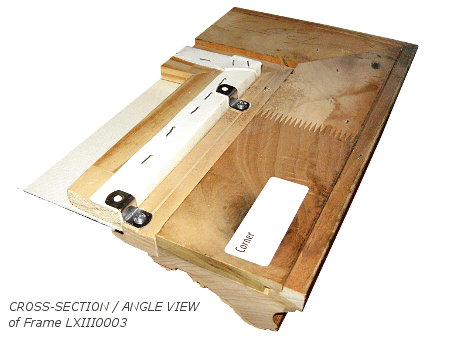
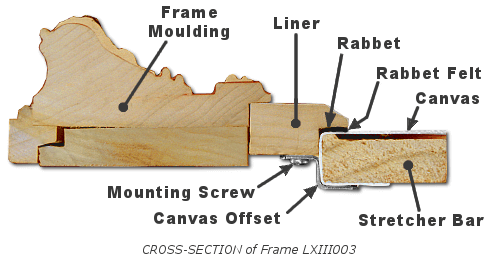
Canvas Offsets
(Canvas Offset Ordering Pages)
Canvas Offsets are the most common hardware choice for securing a canvas to a frame (e.g., Canvas Offsets, Frame Offsets, Z-Clips, Offsets) and are available in several standard sizes: 0/0", 1/8", 1/4", 3/8", 1/2", 3/4", 1", and 1-1/4".
Canvas offset size is determined by the amount of "offset" between the back surface of the frame and the back surface of the artwork after it has been seated into the frame rabbet. The Rabbet refers to the recessed area on the back and inside edge of the frame where the artwork fits. We recommend placing a mounting screw into the frame with no screw into the stretcher.
(Prices start at $2.34* depending on kit size and quantity. Bulk options available.)
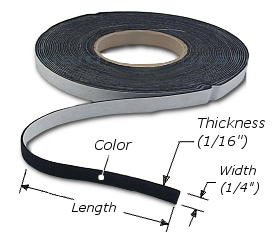
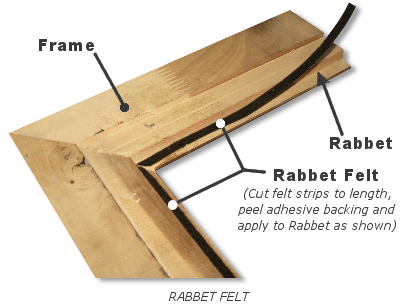
Rabbet Felt
(Rabbet Felt Ordering Pages)
Rabbet Felt Strips "minimize 'Rabbet Rub' ... by lining the Rabbet's inner surface with a cushioning material." [1] Available in 1/4", 3/8", and 1/2" widths; Color black.
(Prices start at $2.19* depending on felt size and cut length. Spool options available.)
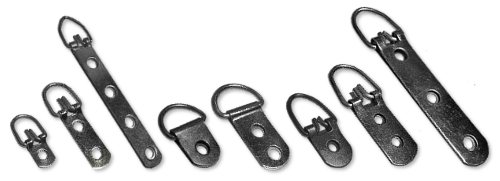
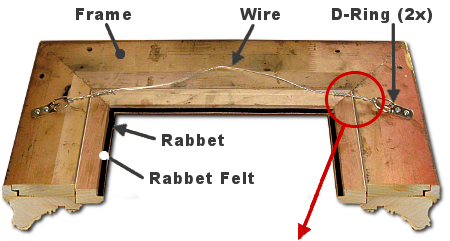
D-Ring Hangers
(D-Ring Hanger Ordering Pages)
D-Ring Hangers are a common hardware choice for frame hanging (e.g., D-Ring Hanger, Flap Hanger, Strap Hanger) and are available in several standard sizes and weight ratings.
We recommend using two or three-hole hangers whenever possible to prevent the hangers from pivotal action while also giving the added protection of having more than one mounting screw per hanger. Only use one-hole hangers on narrow, lightweight frames; we do not recommend screw-eye hangers for frame hanging. Install D-Ring hanger mounting screws into the frame molding only, not the stretcher.
(Prices start at $2.01* depending on kit size and quantity. Bulk options available.)
Super Steel Hangers
(Super Steel Hanger Ordering Pages)
Super Steel Hangers are another common hardware option for frame hanging and are a good choice for frames with narrow molding widths that can hold up to 30 lbs.
Super Steel Hangers are mounted vertically onto the side rail moldings and come in two-hole and four-hole configurations. We recommend four-hole hangers with staggered mounting holes to reduce the risk of splitting the frame's wood. These hangers are suitable for frames made from softer woods. It is recommended only to install Super Steel Hanger mounting screws into the frame and not into the stretchers.
(Prices start at $2.73* depending on kit size and quantity. Bulk options available.)
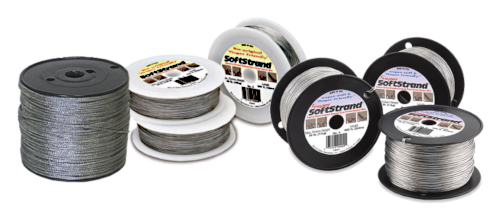
Hanging Wire
(Hanging Wire Ordering Pages)
Hanging Wire is a critical component for frame hanging. (e.g., Hanging Wire, Picture Wire, Picture Cord)
Hanging Wire is available in various weight-rated sizes and looped through wire hangers secured in the molding of the left and right vertical frame. A braided steel wire is recommended (weight rated for at least four times the artwork's and frame's combined weight). The ends of the Wire should be secured so that they do not poke into the back of the canvas or panel - Improperly secured hanging wire ends can drive the canvas leaving a dent or bulge visible on the front of the artwork.
(Prices start at $1.65* depending on wire size and cut length. Spool options available.)
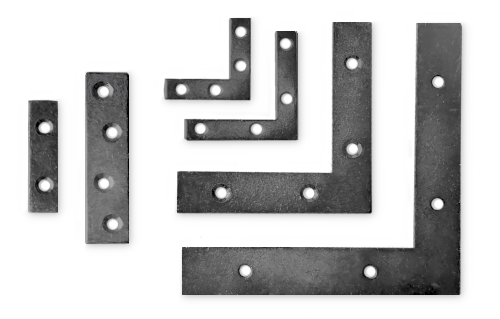
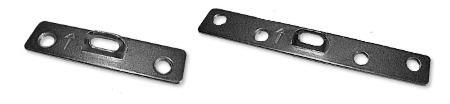
Mending Plates
(Mending Plates Ordering Pages)
Mending Plates can be used in place of canvas offsets but require YOU manually bend the plates to the proper offset distance using a vice or two pairs of pliers. If you are using mending plates, we recommend using 4-hole plates whenever possible - two screws securing the mending plate to the frame with no screws into the stretcher. If your frame molding is too narrow, use two-hole mending plates - one screw in the frame molding and no screw in the stretcher.
Accurate measurements of the rabbet depth, canvas/stretcher bar thickness, and rear protecting/backing cover (if applicable) are required to determine the correct canvas offset size or mending plate forming requirement. Also, depending on the frame thickness, screw length is an important consideration: Typical screw lengths for framing are 3/8", 1/2", or 3/4".
(Prices start at $2.67* depending on kit size and quantity. Bulk options available.)
How do you mount an artwork to a frame?
Painting Surface Preparation
- "Dust the painting's surface using a soft sable brush to dislodge surface dust or dust particles." [1]
- One option for artwork preparation for framing is the installation of Edge Strips all around the painting. Edge strips are installed with a slight projection above the painting surface so that when fitting the artwork into the frame rabbet, it does not touch it.
Frame Rabbet Preparation
- Dust the Rabbet's inner surface to dislodge surface dust, dust particles, and other potentially abrasive materials.
- The off-gassing of chemicals (i.e., Lignin) from unsealed wood liners can discolor artwork over time. Use Vapor barriers to seal unfinished wood liners. (see Mounting Supplies - Vapor Barrier.)
- One option for minimizing "Rabbet Rub," i.e., damage to the artwork surface caused by abrasive contact with the frame Rabbet, is to add a cushioning material to the Rabbet's inner surface. (see Mounting Supplies - Rabbet Felt.)
Fitting and Securing
- Have sufficient padding on your work surface before placing an ornamented frame face down for artwork fitting.
- The canvas should easily insert into the frame Rabbet, not requiring pressing into place. (i.e., no tight fit!)
- Ideally, space should be between the artwork sides and the frame Rabbet. However, the larger the distance, the greater the chance the artwork could shift position, damaging the painting surface.
- After inserting the artwork into the frame-rabbet, secure it using canvas offsets or mending plates.
- Secured Mounting screws into the frame or frame liner only - DO NOT secure screws into the stretcher bars.
- Canvas Offsets or Mending Plates should be spaced every 4 to 6 inches and only exert slight pressure onto the back of the stretcher bars or backing board. (Important: NEVER use nails to secure an artwork to a frame.)
References:
- Gayle F. Clements (Conservator Gilcrease Museum), Guidelines for Framing Canvas Paintings in Traditional Frames without Glazing, Part I, (Jan 1994)
Bibliography:
- Gayle F. Clements (Conservator Gilcrease Museum), Guidelines for Framing Canvas Paintings in Traditional Frames without Glazing, Part I, (Jan 1994)
- Gayle F. Clements (Conservator Gilcrease Museum), Guidelines for Framing Canvas Paintings in Traditional Frames without Glazing, Part II, (Jan 1994)
- www.cci-icc.gc.ca (Canadian Conservation Institute), Framing a Painting (Retrieved 4/1/13)
- www.logangraphic.com, What is Conservation and Archival Framing?, June 19, 2011, (Retrieved 4/1/13)
- www.artifis.com.nz (Artifis Art Framers), Conservation and Museum Level Framing, (Retrieved 4/1/13)
- Smithsonian - Museum Conservation Institute, Caring for Your Paintings, (Retrieved 4/1/13)
How do you prepare a frame for hanging?
Install Hanging Hardware
- Have sufficient padding on your work surface before placing an ornamented frame face down for artwork fitting.
- Only use hangers and hanging wires that are weight rated for your artwork and frame. We recommend using a braided steel wire designed to support at least four times the combined weight of the painting and frame.
- The hanging Wire and hangers should be attached while the frame is empty.
- We recommended using hangers with two or more holes made of plated steel.
Bibliography:
- Gayle F. Clements (Conservator Gilcrease Museum), Guidelines for Framing Canvas Paintings in Traditional Frames without Glazing, Part I, (Jan 1994)
- Gayle F. Clements (Conservator Gilcrease Museum), Guidelines for Framing Canvas Paintings in Traditional Frames without Glazing, Part II, (Jan 1994)
- Smithsonian - Museum Conservation Institute, Caring for Your Paintings, (Retrieved 4/1/13)
What are your custom engraved name plates?
Are your website colors true to life?
We have done our very best to represent the colors of our frames so that the product you receive will closely match what you see displayed on our website. However, there are some reasons why you notice slight variations.
Due to the variable display types and video settings available on smartphones, tablets, laptops, and desktop computers, we cannot guarantee that what your device displays will exactly match the frame.
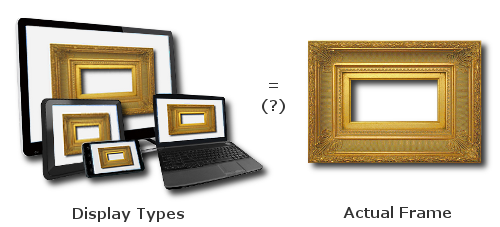
Also, the light source you use to view your frame can change the frame's appearance, i.e., An incandescent bulb will cast a warmer tone over the frame surface, whereas a fluorescent bulb will cast cooler tones.
What forms of payment do you accept?
We gladly accept VISA, Mastercard, Discover, and American Express for phone orders and PayPal for website orders.

"O'Keefe Arts LLC" will appear on your credit card and bank statements.
Painting Frames Plus is a PCI DSS-compliant business. PCI DSS is the Payment Card Industry Data Security Standard (also referred to as PCI). PCI DSS is a standard created by payment card companies (AMEX, Discover, MasterCard, and Visa) to help ensure the safe handling of card-holder data throughout the payments chain.
Websites Secure Socket Layer (SSL) certificates by Sectigo.
How long do frame orders take?
We work with framer makers, frame retailers, and frame wholesalers, both domestic and international. Depending on the frame source, order processing time can range from:
- 2 to 4 days for many ready-made frames.
- 14 to 28 days for made-to-order or custom sizes.
- In rare cases, hard-to-acquire frames may be back-ordered for several months.
We do our best to manage order processing times. If you have a question about an order that is taking longer than expected, please call us, and we will make a particular inquiry about the status of your frame, and we will send you an update.
How are orders packaged and shipped?
Painting Frames Plus is an online retailer of custom-made and ready-made frames and framing supplies, and we work directly with our frame suppliers and frame makers for all packaging and handling of merchandise. Standard shipping charges are included in the frame sale price; however, additional shipping and handling charges may apply under certain situations.
United States Postal Service (USPS)
Framing supplies, i.e., hardware orders, will ship via the United States Postal Service (USPS). We ship using flat rate Priority Mail service, and within the U.S. We DO NOT ship small frame supply orders outside of the U.S. because it's not cost-effective.
United Parcel Service (UPS)
Small frame orders will ship via United Parcel Service (UPS) Ground. Special delivery charges will be added separately to the order. Additional charges for shipments to Hawaii, Alaska, and Canada may apply. Standard deliveries are done Monday through Friday; special rates will apply for Saturday delivery — no deliveries on Sunday. We ship to the U.S. and Canada. Canadian orders are subject to Customs fees and duties.
Old Dominion Freight Line (ODFL)
Large and multi-frame orders may ship via Old Dominion Freight Line (ODFL). Freight shipments always require the customer's signature for receipt of merchandise. Standard deliveries are done Monday through Friday; special rates will apply for Saturday delivery — no deliveries on Sunday. We ship to the U.S. and Canada, and Canadian orders are subject to Customs fees and duties.
Can I change or cancel an order?
After placing an order, Painting Frames Plus will monitor its status and notify customers whenever new information about the order. Also, there are times when a customer wants to change or cancel an order; below are guidelines for handling those situations.
Special Ordered Items

After placing an order, Painting Frames Plus will monitor its status and notify customers whenever new information about the order. Also, there are times when a customer wants to change or cancel an order; below are guidelines for handling those situations.
Back Ordered Items

Items out of stock at the time of order will be back-ordered and shipped when available. For multiple-item orders, all items available for shipment at the time of order will ship unless otherwise specified by the customer.
Changing an Order

If you want to change your order, we will contact the manufacturer or frame maker, and if the product still needs to be shipped, we will change your order. However, if your order has already shipped, we must treat it as a return.
Cancellation of Order

If you want to cancel your order, we will contact the manufacturer or frame maker, and if the product still needs to ship, we will cancel your order. However, if your order has already shipped, we must treat it as a return.
What is your return policy?
Refunds will not be processed without first contacting Painting Frames Plus to obtain a "Return Authorization Number" (RAN) and a return "Ship To" address for any of the following reasons:
Manufacturing Defect, Order Error, or Shipping Damage

Notify Painting Frames Plus within 48 hours of receipt of your ordered merchandise. Merchandise must be returned unused and repacked in its original packaging, including interior packing. O'Keefe Arts shall issue a "call tag" with the shipping carrier and verify arrangements with the customer for shipping carrier pick-up. After the defective merchandise has been returned, inspected, and the reported defect verified, the customer can receive a full payment refund or select a replacement item of equal value.
Not Satisfied with the Merchandise

Notify Painting Frames Plus within 14 days of receipt of your ordered merchandise. The customer is responsible for return shipping and all associated shipping fees. Merchandise must be returned unused and repacked in its original packaging, including interior packing. After the returned merchandise is inspected and is suitable for restocking, the customer can receive a full payment refund or select a replacement item of equal value.